/* Room for two PTE pointers, usually the kernel and current user pointers
* to their respective root page table.
*/
abatron_pteptrs:
.sPACe 8
3. 内核调试
通过以上的准备工作,就可以进行内核和模块的调试了,内核调试步骤如下:
说明:下面的步骤中
8349E-mITX-GP> 表示BDI2000的命令行窗口
[root@newhost misc-modules]# 表示开发主机
DDD> 或GDB> 表示是开发主机上的DDD的调试窗口中
root@mpc8349EMItxgp:~# 表示目标系统中
1. 获取恰当的断点设置位置:
[shyi@newhost pro50_mpc8349_kernel]$ cat System.map |grep start_kernel
c03b05dc T start_kernel #得到start_kernel的虚拟地址
2.设置断点,加载内核,启动DDD的连接
8349E-mITX-GP>reset
8349E-mITX-GP>halt
8349E-mITX-GP>bi 0xc03b05dc (这个值是由System.map中的start_kernel的地址而来的)
8349E-mITX-GP>go
- TARGET: stopped #提示系统进入断点了
8349E-mITX-GP>info
Target CPU : MPC83xx (e300c1)
Target state : debug mode
Debug entry cause : instruction address breakpoint
Current PC : 0xc03b05dc
Current CR : 0x44044022
Current MSR : 0x00001032
Current LR : 0x00003438
8349E-mITX-GP>
# 这时串口可看打到打印信息如:
Uncompressing Kernel Image ... OK
Booting using the fdt at 0xc00000
Loading DevICe Tree to 007fc000, end 007fefff ... OK
图形系统中启动DDD
[root@newhost scull]# cd /opt/pro50/montavista/pro/devkit/ppc/83xx/target/root/examples/misc-Modules
[root@newhost misc-modules]# ddd --debugger ppc_83xx-gdb –gdb /home/shyi/workspace/pro50_mpc8349_kernel/vmlinux
(gdb)target remote 192.168.7.64:2001 (其中192.168.7.64:2001为BDI2000的IP和调试端口)
8349E-mITX-GP>ci
8349E-mITX-GP>break SOFt #改变为软断点方式
这时候可以在DDD>图形界面里面最右边点击鼠标右键来设置断点,如图:
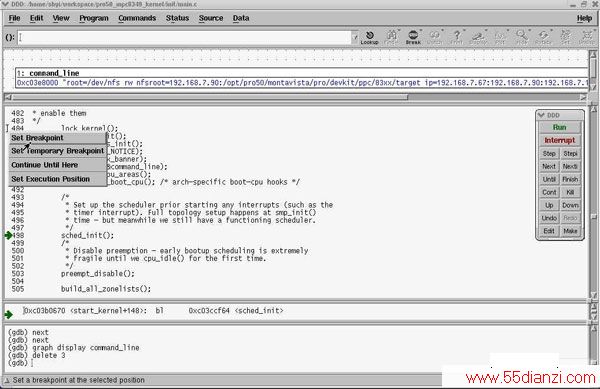
(注意:系统有些地方不能停住,需要在合适的位置来设置断点)
(gdb)cont
这时候系统就会停止在断点设置的地方,接下来就可以进行内核断点调试了,如下图:

4.内核模块的调试
使用LDD3的jit.c模块进行调试的演示,DDD(或者说GDB)GDB的初始化脚本放置在~/.gdbinit:
其中.gdbinit的内容如下:
define lsmod
printf "AddressttModulen"
set $m=(struct list_head *)&modules
set $done=0
while ( !$done )
# list_head is 4-bytes into struct module
set $mp=(struct module *)((char *)$m->next - (char *)4)
printf "0x%08Xt%sn", $mp, $mp->name
if ($mp->list->next == &modules)
set $done=1
end
set $m=$m->next
end
end
define addmodulesymbols
set $myModule=(struct module*) $arg0
set $myAddr=$myModule->module_core
add-symbol-file $arg1 $myAddr
end
document addmodulesymbols
Adds the symbols for a module to the kernel.equires two parameters:
addmodulesymbols <0xAddress> <.ko-file>
end
(说明: 定义了lsmod和addmodulesymbols 2个宏,并且定义了addmodulesymbols的帮助文档)
内核模块调试前面的步骤和内核调试完全一致,先要在start_kernel的地方设置断点,然后让内核能进行调试,接下来:
# 按DDD的按钮继续内核的运行
在内核起来之后→
root@mpc8349emitxgp:~# cd /root/examples/misc-modules
root@mpc8349EMItxgp:~/examples/scull# insmod ./jit.ko
然后在DDD下按→
(gdb) lsmod
Address Module
0xD106FB00 jit
0xD25EE500 ipv6
(gdb) addmodulesymbols 0xd106fb00 ./jit.ko
add symbol table from file "./jit.ko" at
.text_addr = 0xd106e000
(注意启动DDD的时候要在此调试模块的目录下,否则要指定jit.ko在主机上的绝对路径位置)
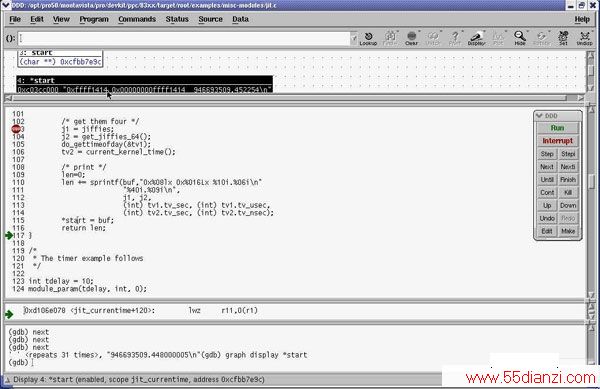
(gdb) b jit_currentime
(gdb)cont
在目标平台输出终端上→
root@mpc8349emitxgp:~/examples/misc-modules# cat /proc/currentime
此时执行停住了,接下来我就可以在DDD中跟踪驱动的执行了。如下图:
本文关键字:暂无联系方式嵌入式系统-技术,单片机-工控设备 - 嵌入式系统-技术


